Pi + JS = IoT
https://github.com/idcrook/rpi-iot-demo-2017
January 9, 2017
Internet of Things
“Oh, so they have internet on computers now!” ~Homer Simpson
Abbreviated as "IoT", refers to physical objects that feature an IP address and can communicate using the Internet.
Examples: Webcams, baby monitors, Weather stations, Hue light bulbs, WeMo plugs, Nest thermostat, Amazon Echo ...
Quiz Time
Question: Does anyone know what the “S” in “IoT” stands for?
Answer: Security.
MQTT
MQTT is an "Internet of Things" connectivity protocol.
Originally created to monitor oil pipelines over satellite links, MQTT is now an open standard.
- Simple, light-weight "PubSub" approach
- Easy to implement on client side
Publish/Subscribe with Topics
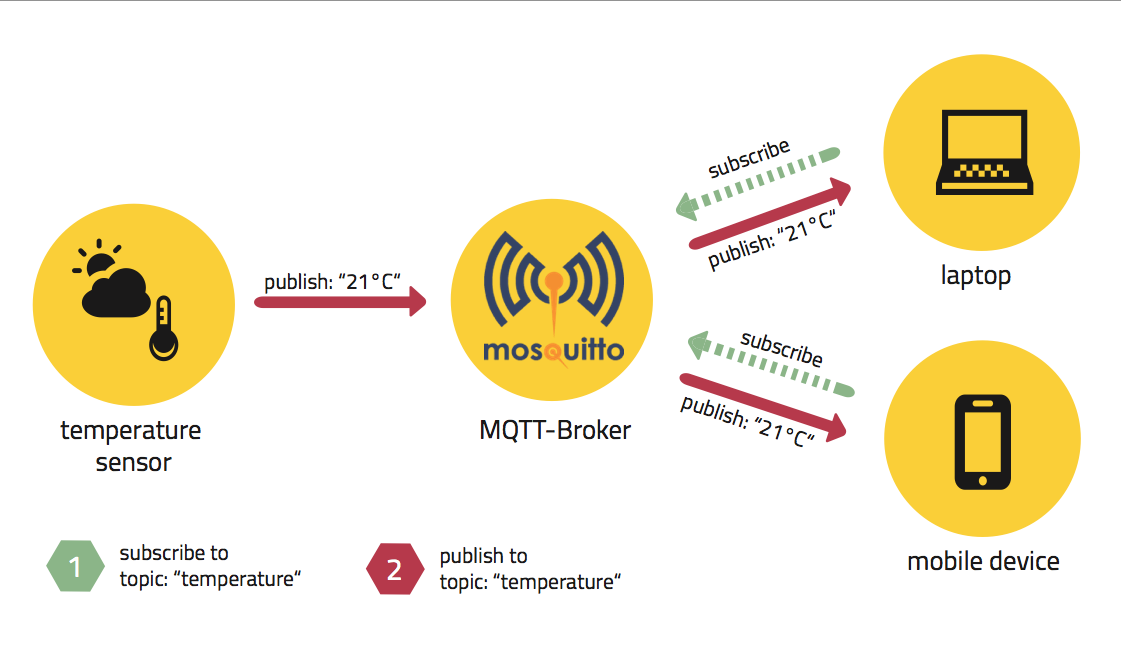
MQTT Broker
In MQTT protocol, a "Broker" does the work of message routing.
For our demo, MQTT Broker is:
- Using WebSockets
- Running on a Raspberry Pi!
Temperature Using MQTT
rpit5 connected -> iot-demo/rpit5/connected
CPU: iot-demo/rpit5/raspi/cputemp °C
GPU: iot-demo/rpit5/raspi/gputemp °C
If MQTT streaming is:
- working: live temperatures will be displayed above.
- disabled: just the "topic" will be displayed, e.g.
iot-demo/rpit5/raspi/cputemp
Raspberry Pi
Raspberry Pi example of a SBC (Single Board Computer)
- Runs complete, modern operating system
- Low-power, low-cost form factor
- Assortment of connectivity available
| Name | Price | Year |
|---|---|---|
| Model B 3 (onboard WiFi, BT) | $35 | 2016 |
| Raspberry Pi Zero | $5 | 2015 |
| Original Model B | $12 | 2012 |
Pieces of Pi
Raspberry Pi models "B+" or "2" in front of you
- Run Raspbian (Linux) from a µSD card
- 5 W power supply (cell-phone charger)
- Ethernet cable
- Can talk using onboard 40-pin header
- We'll use some of these pins today!
- "breadboard" makes wiring easier
Demo Outline
- Network and power up Pi
- Chart live data on webpage
- Wire LEDs to Pi and program
Each Pi shares data using MQTT
Demo Requirements
- Laptop or Smartphone having
- Wi-Fi
- SSH client
- Web browser
- Can share among groups
-
Each station has
- Networked and Powered Pi
- On "Pi Pad" mount
- Components in bag
- Wires / Breadboard
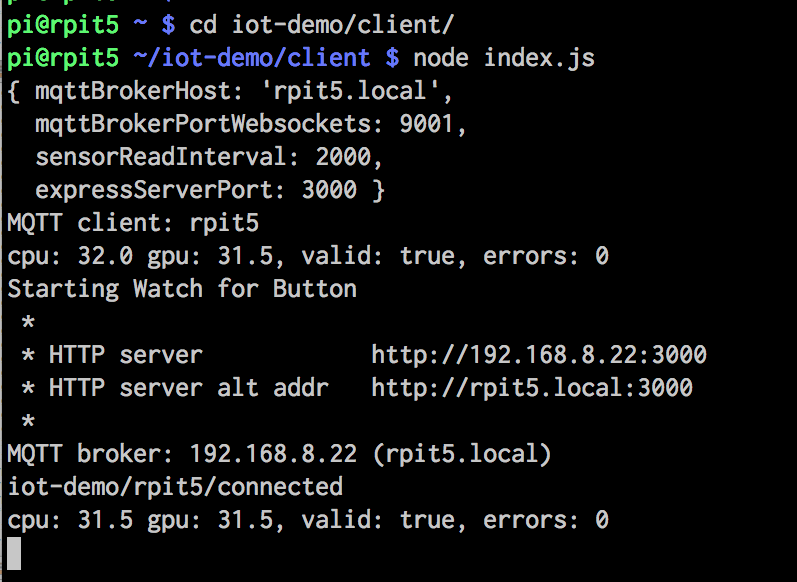
How to Run Client
- Connect to Wi-Fi (raspi-demo)
- Connect and power on Pi
- SSH into Pi
<name>.local:
username:pipassword:raspberry - Run
~/iot-demo/client/index.js
cd iot-demo/client
screen -R
   <Enter>
node index.js
  ... <Ctrl-C> to quit ...
When running, view chart: http://<name>.local:3000
Client output
Let's Get This Show On The Road
SSH to Pi
username: pi password: raspberry
| Name | IP Address |
|---|---|
rpit3.local |
192.168.8.23 |
rpit4.local |
192.168.8.24 |
rpip5.local |
192.168.8.25 |
rpip6.local |
192.168.8.26 |
rpip7.local |
192.168.8.27 |
rpip8.local |
192.168.8.28 |
rpip9.local |
192.168.8.29 |
rpip10.local |
192.168.8.30 |
Live Dashboard
Live Dashboard, Served from a Pi
(MQTT + WebSockets + SVG + Javascript)

What is code doing?
index.js has a few things going on:
- Publish data (e.g., temperature) using MQTT
- Serve webpages with charts
- Watch switch + control LEDs
For that last part to work, it needs to be wired up
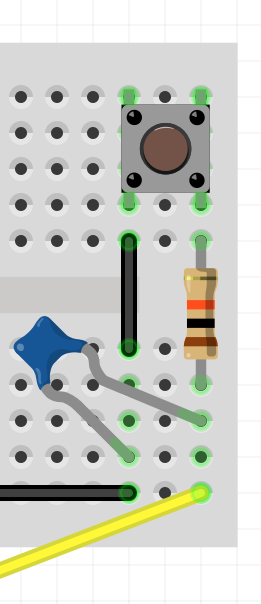
Demo: Part 2
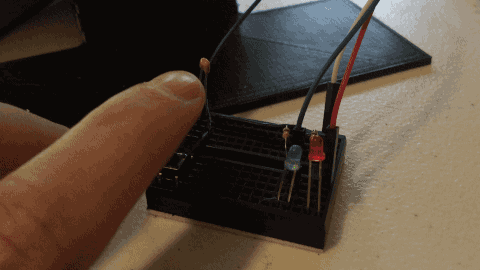
Wire Pi up to make a connected switch
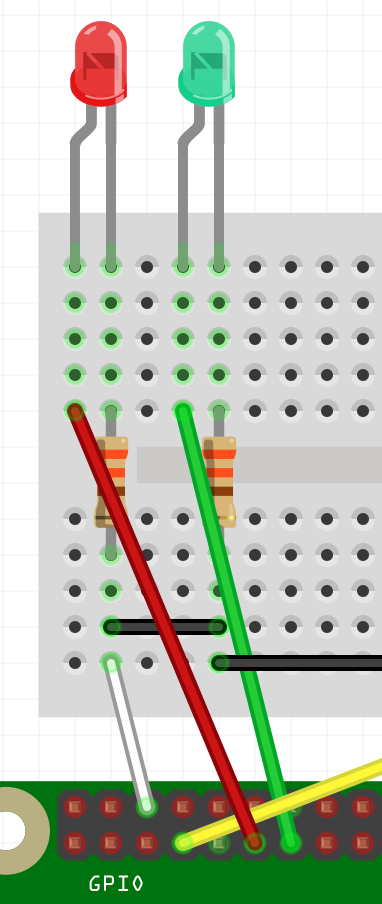
Button and LEDs
Switch presses and LEDs are handled using onoff library.
var button = new Gpio(button_Gpio, 'in', 'both', {debounceTimeout: 20});
var redLed = new Gpio(redLed_Gpio, 'low');
var buttonPressedCount = 0;

button.watch(function (err, value) {
  if (value === 0) {
    console.log('BUTTON PRESSED!');
    // implement a toggle based on button presses
    buttonPressedCount += 1;
    if (buttonPressedCount % 2) {
      client.publish(pubRedLed, 'on', {qos: 1, retain: true});
      redLed.writeSync(1); // 1 = on, 0 = off
    } else {
      client.publish(pubRedLed, 'off', {qos: 1, retain: true});
      redLed.writeSync(0); // 1 = on, 0 = off
    }
  }
}
Wiring Hints
A mini Breadboard connects all holes in a row on each side
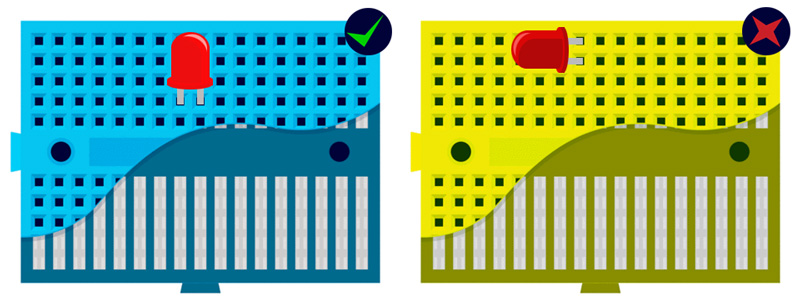
More Wiring Hints
An LED has a direction. Longer lead is "Positive"
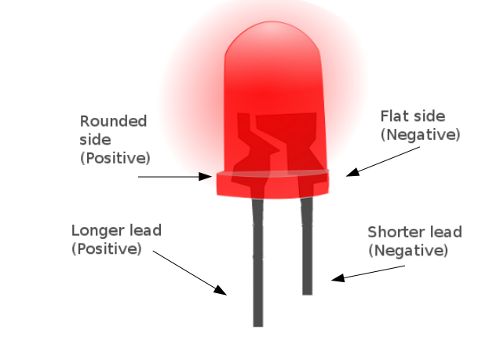
Longer lead shown with a bend in diagram
Wiring Diagram w/ Debounce